


If I were to give an award for the software program I’ve reviewed and valued the most over the years, TechSmith’s Snagit would be toward the top. It’s one of those essentials you immediately install to a new computer because you don’t want to work without it. In this Snagit product review, I’ll highlight some of my favorite features. Just don’t call it a screen capture software program because it can do much more.
Rough Start for Existing Owners
If you follow this site, you know I did not immediately recommend that existing owners of Snagit 2021 upgrade to SnagIt 2022. While there were plenty of enhancements, including a new file format, there were some changes that impacted existing users and their image libraries. In addition, there were some bugs that were very frustrating. If you were a new user, you were probably happy with the robust feature set.
Techsmith did acknowledge and fix the issues. The problems I encountered have been resolved to the extent that I’m comfortable recommending the software program again for all users.
What’s New in Snagit 2022
Throughout the years, TechSmith has been focusing on feature parity between the Windows and macOS versions. One major enhancement they did in this regard is to introduce a new native file format for screen captures. This cross-platform proprietary file format is called snagX.
Granted, countless Windows and Mac programs can take screenshots, such as Windows Snipping Tool. However, what makes Snagit different is that you can create processes that make routine tasks effortless. This is ideal for anyone that visually communicates with others. For example, you can create templates, presets, and themes. I plan on using some of these features to create PDF guides for some tutorials.
Snagit is Two Programs
The first program is the screen capture program, and the second is the image editor and library. Combined, they allow you to capture, enhance, and share images and videos in many ways. Since I wrote my first software review, TechSmith has continually added features and platforms, including the Mac. I think the only deprecated features have been hotspots and link capture. I haven’t used those in years.
Granted, countless Windows and Mac programs can take screenshots, such as Windows Snipping Tool. However, what makes Snagit different is that you can create processes that make routine tasks effortless. This is ideal for anyone that visually communicates with others. For example, you can create templates, presets, and themes. I plan on using some of these features to create PDF guides for some tutorials.
Many Uses for Snagit
Snagit goes well beyond basic screen capture by allowing you to annotate, highlight, record, or call out image elements. Here are some uses you may not have considered:
- Extracting text from images
- Saving online receipts or EULAs
- Converting web pages to PDF
- Creating short “how-to” screen recordings or animated GIFs
- Documenting online account issues
- Removing unwanted image elements
- Resizing pictures
- Capturing program error messages
- Converting one graphic file format to another
- Redacting private or personal information
Supported Image File Formats
One of Snagit’s strengths is that it supports so many file formats. About the only thing I wish it included is .SVG.
- bmp
- cur
- emf
- eps
- gif
- ico
- jpg
- mht
- mp4
- png
- psd
- ras
- snagx
- tga
- tif
- wfx
- wmf
- wpg
Snagit Capture and Presets
The image process starts with capturing elements from your computer screen. As you can see in the image below, the tool allows you to capture images or create videos. To be fair, the video option is limited. Techsmith does have another program for that called Camtasia.
You can see that the tool has a number of options that vary based on your left tab selection.
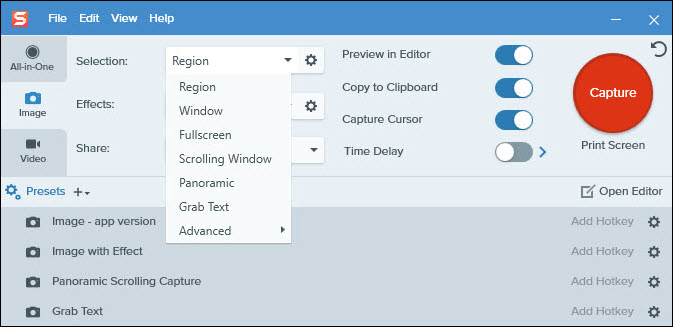
Each time you use the screen capture tool, Snagit remembers your last settings. Moreover, they offer a feature called “presets” to assign to a series of shortcut keys. By default, the PrtScn key is the default hotkey. This is a powerful feature because I can create different presets based on the circumstances. For example, if I’m turning in a software issue to a developer, I want to append my system information.
I can also stack multiple effects to a preset, almost like a macro. For example, I could have the preset apply a watermark, 2px solid black border, and scale the image to 800px wide. So you can get pretty granular yet maintain consistency. And if you work with a team, you’ll be happy to know you can share presets.
After you capture an image, you can send it to your clipboard, SnagIt Editor, or both. This is a handy feature because sometimes, you don’t need additional processing but want to paste the image into a document or email.
Add Effects with Snagit Editor
The editor is where you enhance the image. An enhancement could be anything from adding callouts to hiding an element. In many cases, you can act on these effects until you flatten or save the image. This allows you to move items, change colors, etc. I found this beneficial as I may change the image elements I wish to highlight.
The program is also good about alerting you to issues. For example, if I resize the image after applying the gold letterboxes in the screen snap below, Snagit will tell me I need to flatten the image. You might think of these callouts as a layer. If I flatten the image, I now have 1 layer.
If I run into issues, I can hit the Undo button and revert my change. What I’ve started to do is to copy my original .snagx file into another file format like JPG. Then if I have to make some sort of modification, I can pull up my original .snagx file.
You can also open raster image files that were not captured using Snagit. Raster images are made of pixels and include popular file formats like JPG, BMP, GIF, etc. However, you couldn’t create a vector graphic and save it as an SVG or AI file. Don’t expect this program to work like Adobe Illustrator or Adobe Photoshop.
To illustrate a few of the image editor’s features, I took a screen snap of the Snagit product page and used the Step feature to add the gold square letter icons. You may have noticed that I also used the program to scale the image down but retain the aspect ratio.
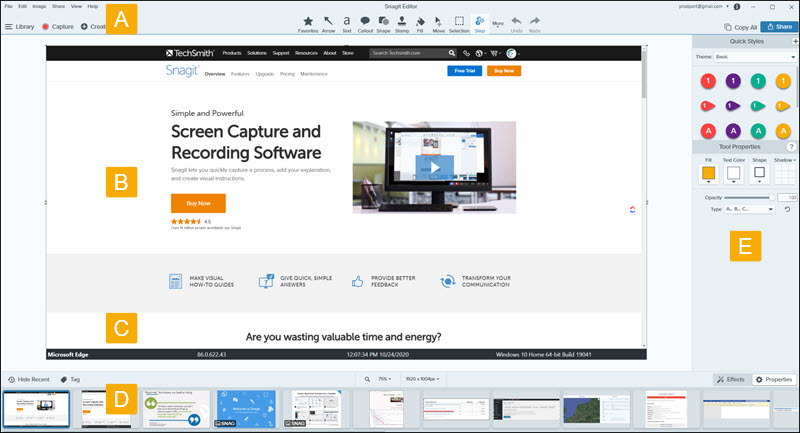
This top section represents the main editor toolbar. There is also a small menu to the left. The toolbar area is customizable, and you can add drawing tools, menu items, share destinations, or effects. This includes rearranging the icon order. Clicking a toolbar icon shows its styles and properties on the right-side [E].
[B] Your captured or imported image resides on the canvas. You can adjust the image size using the sizing handles. The program can take scrollable and panoramic screen captures. In years past, scrollable images would freeze my screen. In my testing, all the captures worked as expected.
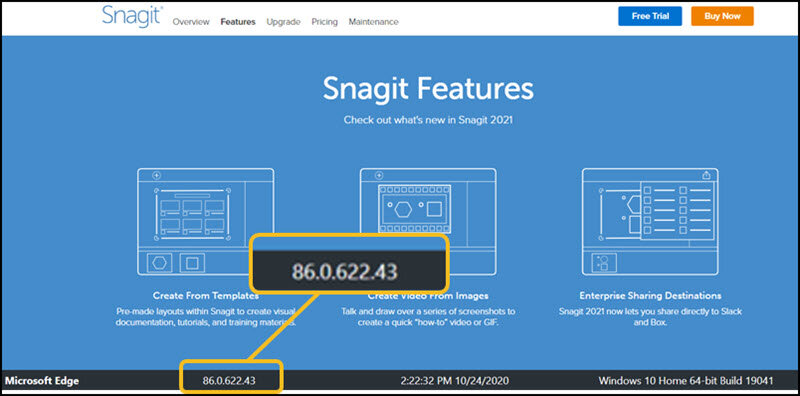
[C] Based on your preferences, you can have the program append info about the program used and recorded time. The program might be a web browser, spreadsheet, or even your favorite code editor like Visual Studio Code.
In the screenshot below, you can see the Microsoft Edge program info. I’ve also used the “Magnify” feature. This is where I can highlight a screen portion and then have it linked to a larger version to call out the detail.
One interesting detail about Snagit is it always remembers the capture info. While I have this included in one of my presets, I can always add this information after the fact. You’ll appreciate this feature when some developer emails you asking for the info from a ticket you turned in weeks ago.
[D] An image carousel of recent screen snaps in thumbnail size. Each image can be tagged to make them easier to find. And if you prefer to have more space, you can hide the area or reduce the thumbnail image size.

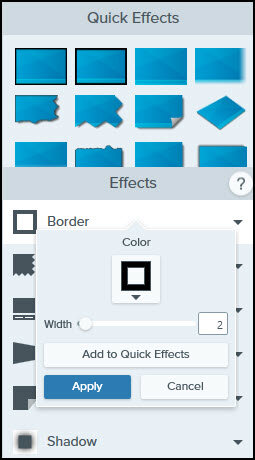
[E] Side panel with Effect properties. You can think of an effect like an enhancement. You can either use predefined “Quick Effects” or create your own. For example, I might apply a border. In turn, that border has specific properties like color, width, and so on. I can then add my preferences to Quick Effects. One benefit to these Quick Effects is you can hover over one to see how it would impact the image.
The Asset Library
The Snagit library is a feature that is easy to overlook because it is accessible from the top left menu of the editor. By default, Snagit saves each capture unless you delete it. This gives you access to your images or videos in multiple ways. I should mention this doesn’t include all images on your computer, but just ones you’ve used in Snagit. For example, the library won’t show a JPG file someone sent you in an email, and you saved it in your downloads folder. However, if you were to open that file in Snagit, it would show in the library.
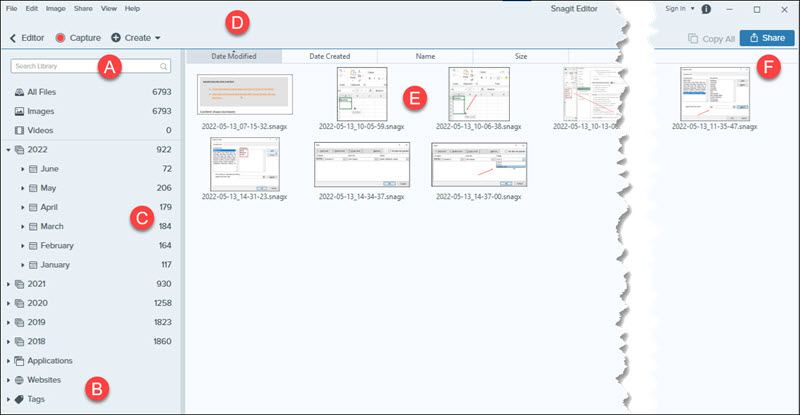
[A] At the top is a search bar.
[B] Along the left side is a series of options to refine your search ranging from asset type to image tags. When you click an option, the corresponding images appear to the right [E].
[C] This indicates the number of matching assets. For example, my Snagit library has 6793 images of which 922 are from 2022.
[D] You can further refine your search by using the column headers at the top. In my example, I’ve sorted by Modified Date.
[E] These are the matching thumbnails for your criteria. You can click a thumbnail to pull it into the editor. If you deleted an image outside of Snagit, you’d see a ghost placeholder.
[F] The Share button provides a number of sharing options with popular services ranging from email to Slack.
I used a different Step preset and Cut Out a portion of the image in the screenshot above, so I didn’t have to scale it down more. There was lots of space between items [E] and [F]. What’s nice about the Cut Out option is it can show visual clues that a section has been cut or just stitch them together for a seamless look. And yes, you can adjust the column width by dragging the gray line after the count column.
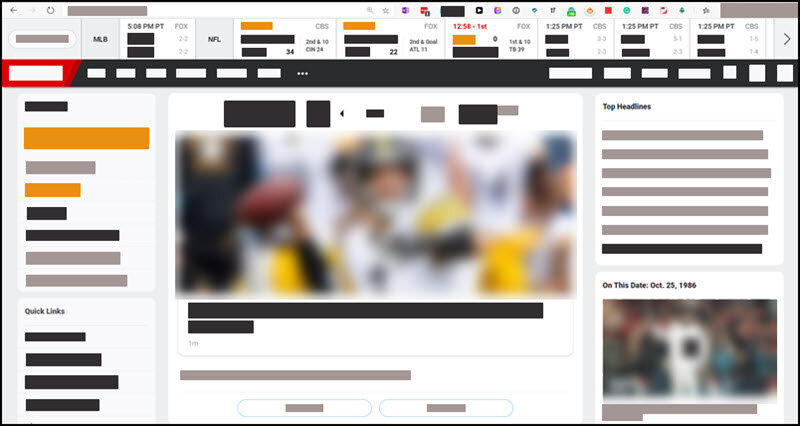
Streamline with Simplify
One of the newer features of the program is Simplify. There are some good use cases for this feature. For example, I might have a screen snap that contains personal data. I could use the Blur feature, but some people don’t like that effect or the intentional pixelated portions. In contrast, Simplify uses solid bands to hide content. There are also many Quick Styles you can apply. You’re not limited to colors and can create your own.
This feature can be useful with web pages. Perhaps, you’re thinking of redoing a site and want to convey some ideas to the designer. In this case, Snagit detected the page’s colors and used them for the bands. I also used the Blur effect on the hero image and sidebar photo.
TechSmith realizes that users may want to apply certain features and tasks regularly. Regardless of where you are in the program, you’ll see references to presets, Quick Styles, and themes. Each of these options allows a fair degree of customization. Even if you don’t want to build a theme or template, you can mark an effect as a “Favorite.” This allows you to get easy access from the editor toolbar.
Training Resources
It would be impossible to cover all of Snagit’s features in this software review. After using the program for over 10 years, I’m still learning. However, TechSmith does an excellent job of providing instructional documentation. In addition, once you buy or download the trial program, you get an email informing you of their tutorials, Help Library, User Community, and support.
Product Summary
Snagit is an extremely versatile screen capture and recording program for either Microsoft Windows or Mac. The new cross-platform snagX file format should make it easier for users who need to share digital assets with other team members. In addition, the ability to save files to popular online storage providers should make the program useful for remote workers. Moreover, the company has continued to improve its core features.
The main disadvantage is some people may view the cost on the high-end since both operating systems have free screen capture programs. Snagit comes with a lifetime license and first year for $62.99 which includes an upgrade to the next major version. Annual maintenance costs are quite minimal.
My suggestion would be to try the free 15-day trial for yourself. While Snagit may cost more, it will make you more productive and efficient.
- Operating Systems: Windows and macOS
- Cost: $62.99; educational licenses available for a lower cost
- Trial: 15 Day
- Product page: https://www.techsmith.com/screen-capture.html
- Trial Download page: https://www.techsmith.com/download/snagit/
- Ease of use: Excellent
- Documentation/ Support: Excellent
- Overall score: 4.7
0 Comments