

I hope this review will assist you if you’re thinking about investing in Camtasia.
What is Camtasia?
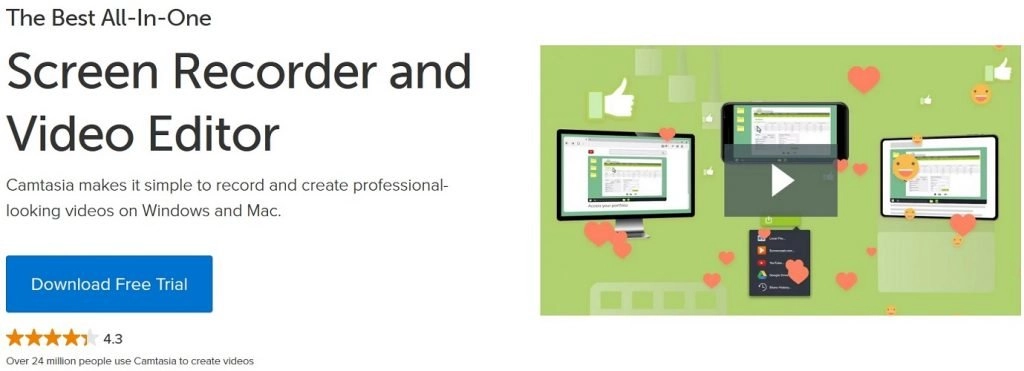
Camtasia is an all-in-one screen recorder and video editor software that has been around for over 15 years with over 24 million users!
It is a piece of software that is very useful for those creating video tutorials and screencasts.
This means that with Camtasia, there is no need to have a separate video recorder and video editor; everything can be done under the same hood.
As an experience video tutorial creator, trust me when I say this is far more efficient!
In my opinion, Camtasia is the best screen recorder, and hopefully, this Camtasia review will do it some justice.
Camtasia pricing
There are different Camtasia pricing plans, which will depend on your needs and circumstances.
- Individual – $249 (one-time fee)
- Business – $249 (one-time fee); with volume discount pricing
- Education – $169 (one-time fee); with volume discount pricing
- Government & Non-Profit – $223.97 (one-time fee); with volume and discount pricing
You can also add Camtasia Maintenance to your plan.
Camtasia Maintenance costs $49.75 per year on Individual plans (this price changes for the other plans) and includes guaranteed upgrades to the newest version of the software (released annually) and priority support.
If you have an older version of Camtasia, without their Camtasia Maintenance, then you can purchase an upgrade for a one-off price.
This price will vary depending on your circumstances; an individual upgrade will cost $99.50.
All purchases of Camtaisa also come with a 30-day money-back guarantee.
Is there a free trial of Camtasia?
You will be happy to hear that there is a 30-day completely free trial of Camtasia.
To download the free trial, simply click here.
What’s new in Camtasia?
Before I dive into the nitty-gritty of this Camtasia review, I thought I would briefly cover the new features introduced into Camtasia.
This latest version introduced 8 new main features over its predecessor, including:
- 75+ new transitions – Fresh transitions to make your videos pop
- Emphasize audio effect – Automatically reduce the volume of music when a voiceover is played on top of it
- 3 new video effects – Corner rounding, media matte and motion blur have been added
- Proxy video – Edit large video files without lagging
In a nutshell, Camtasia 2021 adds some much needed video and audio effects to the video editor, as well as some performance improvements.
So, if you work with other Camtasia users, then it’s certainly worth looking at upgrading.
Features of Camtasia
Since there are hundreds of features within the software, in this Camtasia review, I will focus on the main capabilities rather than each individual feature.
The standout features of Camtasia are:
- Record screen and camera
- Annotations
- Effects
- Zoom and pan camera
- Cursor effects
- Scene transitions
- Various canvas dimensions
I’ll now go over each of the above features in a bit more detail.
Record screen and camera
Recording in Camtasia is controlled with the simple Recording Toolbar, which pops out of the software. Note, the Toolbar has been simplified even further in the latest version of Camtasia.
All that is required is that you select the area you want to record and your recording inputs (camera, microphone and system audio).
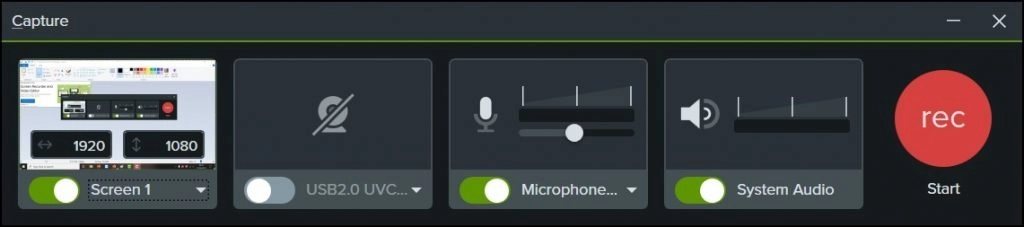
You can, of course, capture and record your full computer screen.
Or, there is a selection of screen dimensions to choose from, including widescreen 1080p HD (1920×1080).
Alternatively, if you only want to record a selection of your screen, you can do so. You simply draw a grid around what you want to record and only the content inside the grid will be captured.
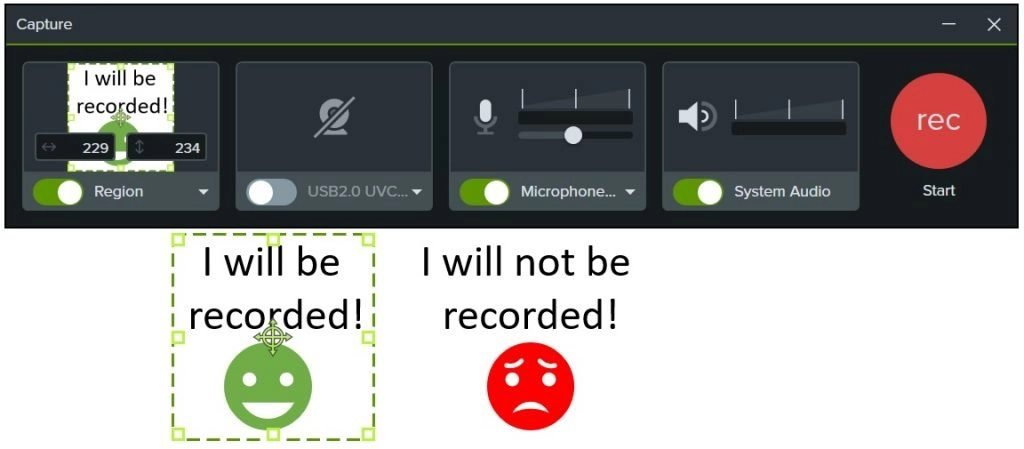
I use this feature often when I want to create a GIF of something. Instead of making a super large GIF of the whole screen, I only capture what I need.
Annotations
If you’re creating video tutorials, then annotations are really useful to use to make your videos easy to follow.
There are 6 categories of annotations to use:
- Callouts
- Arrows and lines
- Shapes
- Blur/highlight
- Sketch motion
- Keystroke callouts
Callouts are a selection of arrows and speech clouds that have text inside them. These are useful to add key messages onto videos and to highlight regions of interest.
There are different arrow and line styles to use. These annotations are great to use when wanting to emphasize movement on-screen.
Shapes are exactly that; a selection of different shapes, including rectangles, stars and triangles.
The blur and highlight capabilities are handy when you want to block out part of a screen, for example, if your video involves you entering your email address, you can easily blur this out.
Sketch motions are the annotations I use the most when I create video tutorials with Camtasia. These are a selection of arrows and shapes that automatically animate as if they were being drawn.

Finally, there are keystroke callouts available. So, if you state to use a keyboard shortcut in your video, you can show the keys on the screen. Just simply tell Camtasia the shortcut you want.
Effects
Camtasia has quite a lot of video, audio and text effects that can be easily dropped onto the piece of media on the track.
These effects can spice up your content.
I’ll now go over each of these effect types.
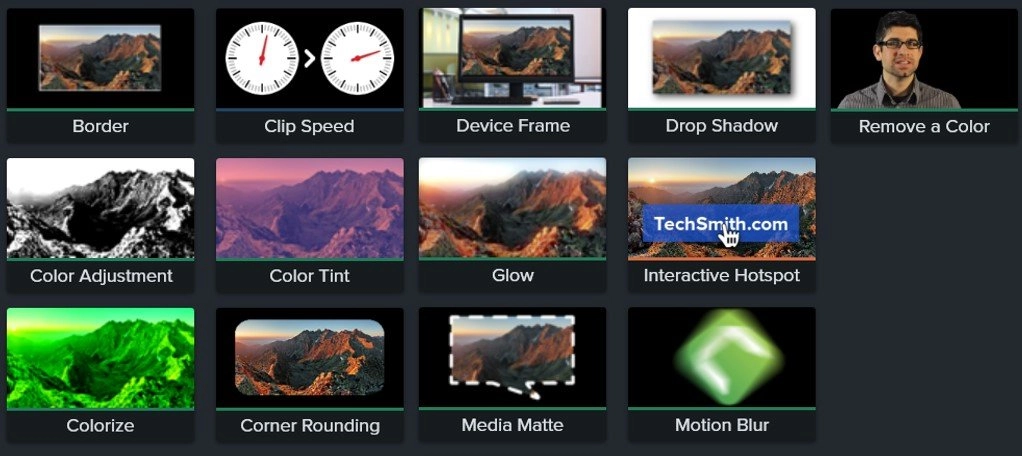
Video effects
There are 13 different video effects that you can use in Camtasia, these are:
- Border – Adds a border around the video clip
- Clip speed – Either speed up or slow down a piece of video
- Color adjustment – Adjust the brightness, contrast and saturation of the clip
- Color tint – Applies a color overlay to the video
- Colorize – Adds a subtle color effect to the clip
- Corner rounding (new in Camtasia 2021) – Smooth out object corners
- Device frame – Adds the clip inside a device frame of your choice, including a desktop computer or iPhone
- Drop shadow – Adds a shadow effect to the clip
- Glow – Makes the clip seem like it is glowing
- Interactive hotspot – Add an interactive area on the clip, such as a hyperlink to a webpage
- Media matte (new in Camtasia 2021) – Create masks from objects
- Motion blur (new in Camtasia 2021) – Makes an object look like it’s moving very fast
- Remove a color – Remove a color of your choice from the video clip; useful when using a green screen, for example
The device frame visual effect is pretty slick. Simply drag the effect onto the clip and choose from an existing frame, such as a desktop, iPhone or laptop. Then watch as your clip is perfectly positioned inside the device.
Here is a screenshot of a screencast I made with the MacBook Pro device frame added.
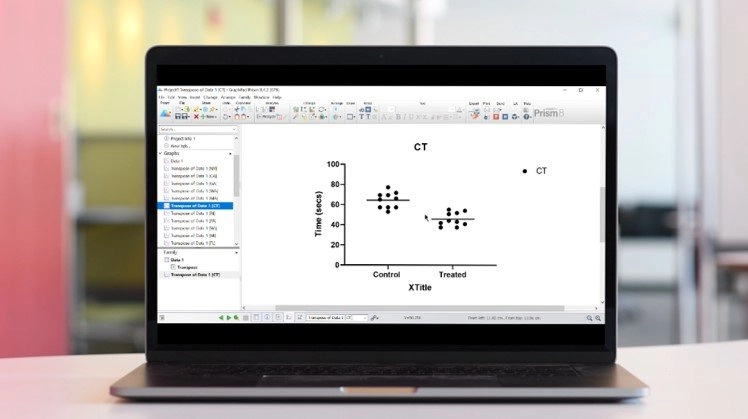
There are also various other device frames to download from the Camtasia asset store.
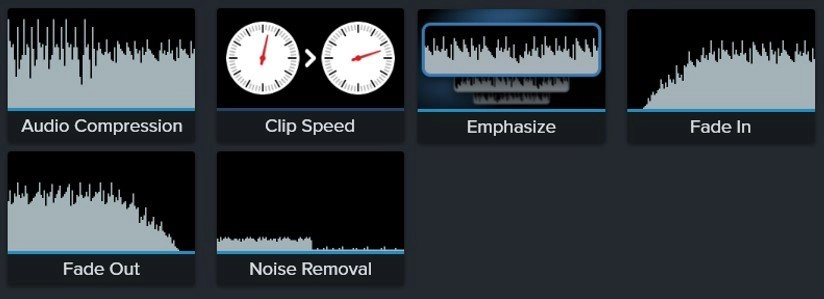
Audio effects
As well as video effects, Camtasia also has a few audio effects that can be easily dragged onto an audio track.
There are 6 different audio effects available within Camtasia:
- Audio compression – Normalize different pieces of audio
- Clip speed – Speed up or slow down a piece of audio
- Emphasize (new in Camtasia 2021) – Automatically adjusts the volume of overlaying audio tracks; perfect for projects with voiceovers and background music
- Noise removal – Remove unwanted background noise
- Fade in – Gradually increase the audio at the start of the clip
- Fade out – Gradually reduce the audio at the end of the clip
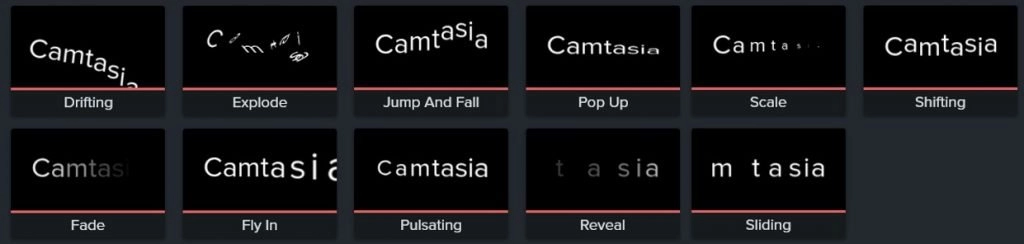
Text effects
Lastly, there are text effects. Within Camtasia, these are actually called behaviors and can be applied to text or video clips.
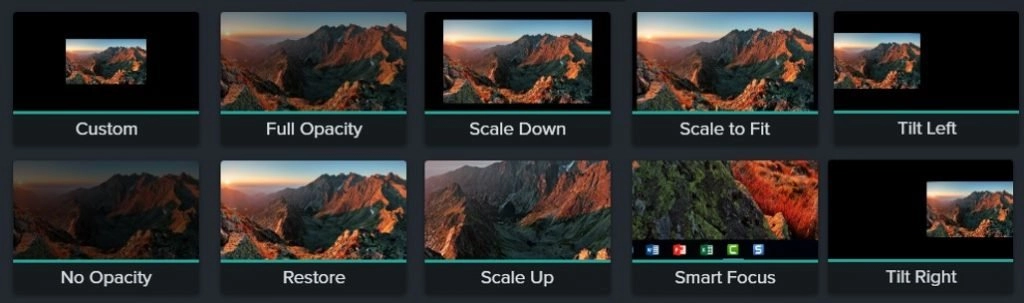
There are 11 different behaviors to choose from. You can see them all in the screenshot below.
Zoom and pan camera
Adding a zoom or pan effect to your videos is ridiculously easy with Camtasia.
By using the thumbnail preview, you simply change the size of the camera area and the software will determine the optimal settings for the animation.
An arrow is then placed on the timeline, which acts like a keyframe tool. The beginning of the arrow marks the camera’s starting position, while the end of the arrow marks the end camera position.
For example, the screenshot below shows the starting position of the camera. Note, this starts at full screen.
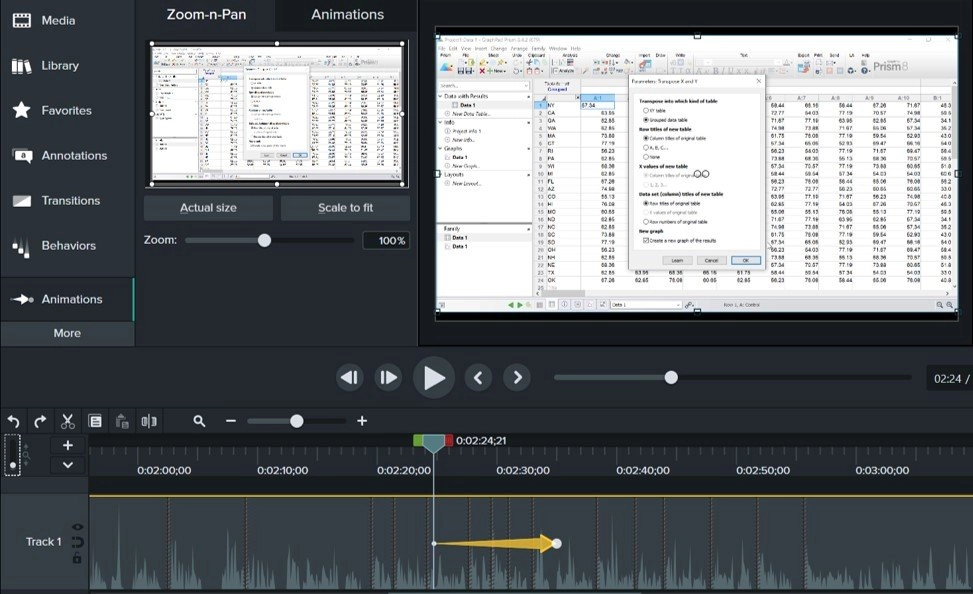
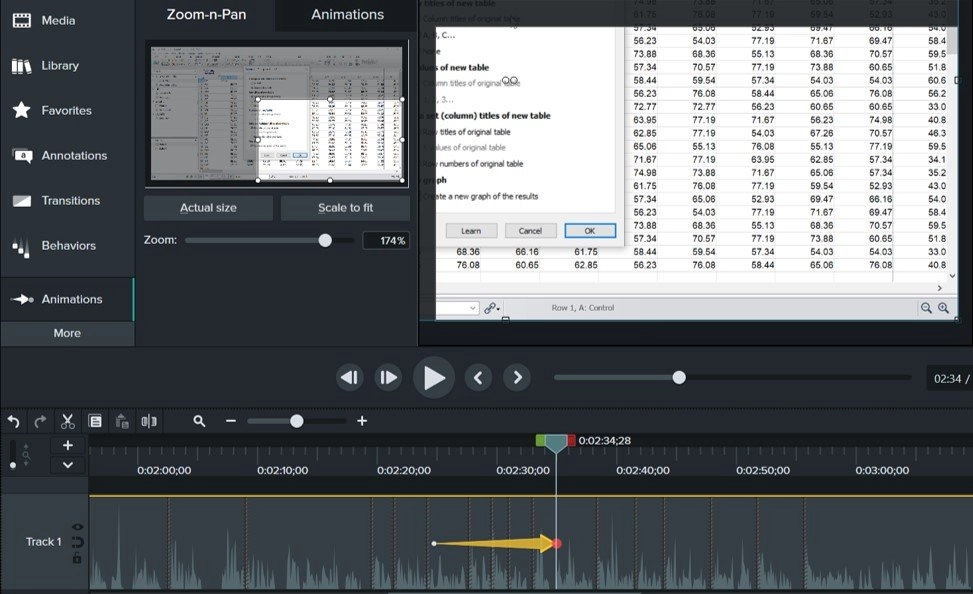
And now, here is a screen shot showing the end position of the zoom and pan effect.
All I did here was change the size and position of the small rectangle within the thumbnail on the left. Then, Camtasia applied the zoom and pan effect – simple!
Changing the length of the arrow alters the speed of the effect. So, shorter arrows will result in a faster zoom, for example, and vice versa.
As well as manually applying a zoom and pan effect to your video, you can also apply different animations.
Animations work like most effects, with an arrow placed over the track.
Adjusting the length of the arrow can speed up or slow down the animation, which changing the beginning or end keyframes adjusts how to animation will look.
There are 10 different animations within Camtasia, these are:
- Custom – Set your own start and stop positions and Camtasia will animate the clip accordingly
- Full opacity – Increases the opacity of the video to 100%
- No opacity – Decreases the opacity of the video to 0%
- Restore – Returns the clip to it’s original state
- Scale down – Reduces the scale of the clip so it appears smaller
- Scale to fit – Ensures the video clip is fit to screen at the end
- Scale up – Applies a zoom in effect
- Smart Focus – Automatically applies a zoom and pan effect to the clip to track the regions of interest
- Tilt left – As the name suggests, tilts the clip to the left
- Tilt right – You guessed it, the clip will be tilted to the right
A lot of the animations work very well for me.
However, I’m not totally convinced with the Smart Focus feature. To use this, you need to have a canvas that is smaller than 1080p. And, when applied, the end zoom and pan settings seem rather sporadic.
Cursor effects
Another nice feature of Camtasia is the cursor effects.
By applying these effects onto the video, you can adjust the cursor to make it more visible; this is really handy if you are recording screencasts.
There are 4 cursor effects in Camtasia:
- Highlight – A colored ring around the cursor
- Magnify – Applies a zoom-in effect around the cursor
- Spotlight – Darkens the rest of the video, while applying a cursor spotlight
- Cursor smoothing – Reduces redundant cursor shaking

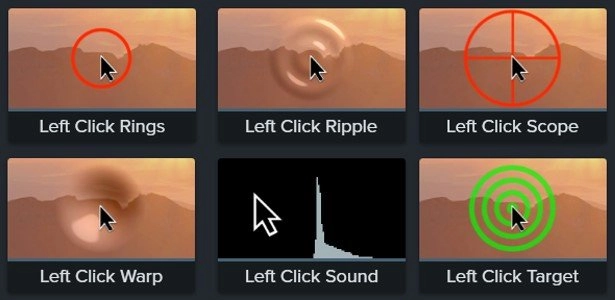
As well as cursor effects, there are also left- and right-click mouse effects. It’s possible to add different effects following a mouse click. These are click:
- Rings
- Ripple
- Scope
- Sound
- Target
- Warp
Scene transitions
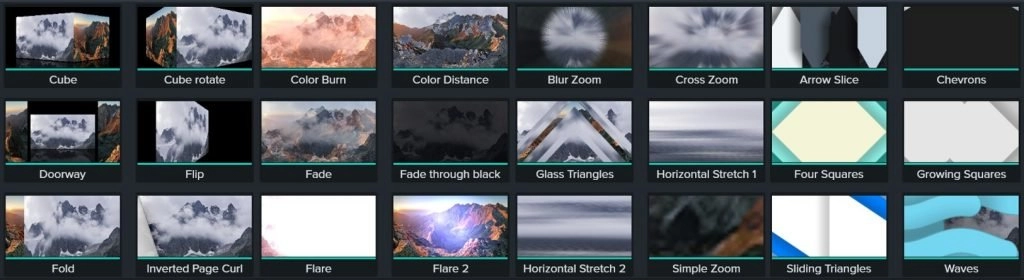
Camtasia 2021 comes with significantly more scene transitions than Camtasia 2020; you’ll now have access to 121 different transitions!
Scene transitions are split into 8 different categories:
- 3D
- Blurs
- Divisions
- Fades
- Radial
- Solids
- Splits
- Wipes
The screenshot below shows just a selection of the available transitions in Camtasia.
Transitions can be added at the start and end of clips as well as bridging between two clips.
If transitions are applied between clips, then you can specify whether or not to use the trimmed content during the animation.
There is also the possibility of having the transition animation play in reverse if you prefer it that way.
Various canvas dimensions
The canvas is area that Camtasia will use to export and render your video. So, anything that is within the canvas will be captured on the final video.
There are quite a few different prepopulated canvas dimensions to work from, including:
- 4K UHD (3840×2160)
- 1080p HD (1920×1080)
- 720p HD (1280×780)
- Instagram (640×640)
- Facebook cover video (820×462)
- iPhone XS (1125×2436)
- iPad (2048×1536)
If you need a custom video dimension, then you’re also covered with Camtasia.
You can manually change the width and height to apply a custom dimention.
There are also various frame rates to work with, these are:
- 25 fps
- 30 fps
- 50 fps
- 60 fps
I only really work with 1080p HD dimensions at 30 fps, which is pretty standard.
But, it’s great to see other needs are catered for.
Sharing videos
When it comes to rendering your video, there are two different routes you can go down: instant sharing to an online platform or save as a local file.
You can instantly share your video to:
- Screencast.com – TechSmith’s cloud-based sharing platform
- Knowmia – TechSmith’s online class creation platform
- TechSmith Video Review – A platform used to gain feedback on your video from collaborators
- Vimeo
- YouTube
- Google Drive
So, if you mainly use Camtasia for making YouTube videos, you can use the sharing options to upload the video directly to your connected YouTube account.
Admittedly, my videos are mainly for YouTube, but I prefer the classic export to a local file option since I feel like I have more control over the process.
This brings me nicely onto the standard export capacilities of Camtasia.
Files can be exported as:
- MP4 – The gold-standard video format these days
- WMV – Windows Media Video
- AVI – Another popular video format
- GIF – Animated images
- M4A – This captures audio only
I mainly export MP4 files, which are later uploaded to YouTube. Sometimes, I create animated GIFs, for use on this particular blog :).
Camtasia support
The level of support you will receive will largely depend on whether you purchase Camtasia Maintenance or not.
Standard support includes access to:
- Support ticket system – You send in a query and the Camtasia team will email you back
- Video tutorials – As expected, these are very good, high-quality tutorials to show you the ropes; I certainly recommend these
- Webinars – Not that frequent, but certainly useful
- Community forum – A rather large (>80,000 members) forum where users help each other out
Holders of Camtasia Maintenance also get access to:
- Live chat system
- Dedicated phone queue
- Exclusive access to 15+ hours of Camtasia online training, which includes a certificate at the end
3 things I love about Camtasia
Now you know what Camtasia is and what it has to offer.
Let me now focus this section of my Camtasia review to go over my personal likes and dislikes about the software.
It’s everything I need in a single package
As an online video tutorial creator, I need access to a quality screen recorder that captures crisp screen recordings and a video editor for adding those all-important visual aids.
Camtasia ticks all of these boxes!
This means I can work more efficiently; there’s no need to mess around with multiple software.
Everything I need is all here.
Simple, yet powerful visual effects
I’ll be brutally honest, I’m no video editor. Sure, I know the basics, but I can’t make amazing effects to make my videos pop.
What I love about Camtasia is that you don’t have to know a lot about video editing to produce amazing results.
You’ll be surprised just how much a camera pan and zoom and a cursor effect can add to the quality of your screencasts.
Camtasia makes creating professional looking video tutorials super easy.
Amazing support and resources
Another thing I really like about Camtasia is the level of support, both from TechSmith and the community.
Their video tutorials are really clear and very enlightening. I’ve learnt a lot of hints and tips by watching these short clips.
There is also a wealth of downloadable assets, such as templates, themes, device frames, intros and outros, from the TechSmith website. Many of these are free too, which is a bonus!
Since Camtasia is a fan favorite, there is also a large community that continuously support each other. This is evident from thousands of forum topics and YouTube videos on Camtasia.
3 things I don’t like about Camtasia
To be perfectly honest, I struggled to find 3 things that I disliked about Camtasia. But, I will honour this balanced Camtasia review to extract the smallest of flaws.
Future updates are not as standard
So, as you saw at the start of this Camtasia review, ongoing future updates are not included with a standard licence, unless their Maintenance package is added.
This Maintenance add-on required an ongoing annual subscription to receive future Camtasia software versions.
I get why certain software restricts customers to a particular version. I know they run a business.
But, I am always a little saddened to see an ongoing fee.
It’s a good job Camtasia is worth it!
Disappointing Smart Focus
Applying the zoom and pan effect to my video tutorials has really improved the quality of my content.
But, this process is quite time consuming since you have to manually change the keyframes throughout the video.
This is where Camtasia’s Smart Focus is supposed to help. It’s a feature that detects the cursor movements throughout the video and automatically applies the zoom and pan effect.
I was hyped about this. It could save me a tonne of editing time. But instead, it fails every time for me.
The results were quite disappointing. Most of the camera movements did not capture the region I wanted, so you end up manually placing them anyway.
Also, you can also use the Smart Focus on smaller canvas sizes. This meant that I could not render at my desired 1080p dimension.
So, I avoid this feature altogether and still manually apply the zoom and pan. Sure, it takes me a heck of a lot longer, but at least I get the result I am happy with.
Rendering time is unknown
A slight niggle I have with the export feature is that Camtasia does not tell you an estimated rendering time or time to completion. All that you can see is the progress bar.
This is no big deal, but it would be nice to see an estimated time for rendering a video.
Sometimes, I may only have 10-15 minutes spare before I have to close my laptop down, and so I do not know if I can squeeze in a video render.
Maybe we will see this in future updates.
Camtasia alternatives
Like the look of Camtasia, but think it’s too pricey? A lot of people think so.
If so, check out my list of the best Camtasia alternatives (some are even free).
A special shout out goes to Filmora. Check out my Filmora review to see why or my Camtasia vs Filmora post to see how they compare.
Final thoughts
It’s now time for me to wrap up this Camtasia review.
I cannot recommend Camtasia enough for those looking for a powerful, yet easy to use screen recorder and video editor.
It’s the ideal investment for online content creators, especially if you’re creating screencasts and tutorial videos.
But, if you want a video editor that comes with more effects and editing capabilities, then Camtasia may not be the best option; instead, check out Filmora.
If you’re still on the fence after reading this Camtasia review, then I strongly recommend you download the free trial of Camtasia to try it out for yourself.
Let me know in the comments below how you found Camtasia. I’m interested to hear other’s thoughts.
0 Comments